04 / 04 / 2016
Hey everyone! Lately I´m having a lot of fun trying out some Pixelmator tutorials and I really want to share one of my favourite ones with you. So with this tutorial you can learn how to add a beautiful summery and dreamy effect to your images. It pretty much works on every photo and it´s super easy as well because I guide you through step by step.
Obviously you´ll need the Pixelmator programm which unfortunately isn´t for free. It´s not super expensive though, so
don´t worry.
1. Choose am image you´d like to use the effect on and open it in pixelmator.
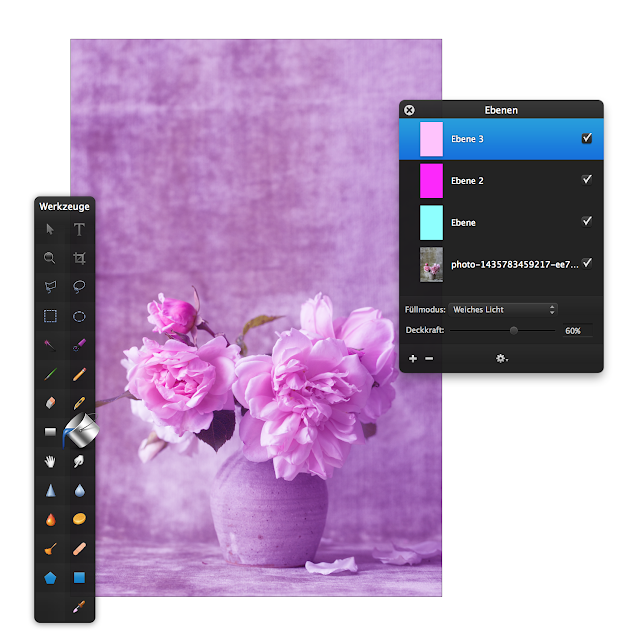
In the photo below you can see the image with the pretty flowers I choose. So because I´m from Germany all the lettering is in German and I have no clue how to change it in English. If someone knows please leave me a comment and enlighten me. I´m just going to translate it real quick. On the right you can see the layers, so the image of the flowers I chose is the base where we are going to layer on top. There you see the word Füllmodus (Blending) and Deckkraft (Opacity) too. On the left you see all the different tools. For this tutorial we only need the Paint Bucket Tool. In my previous post about pixelmator I explained a few more tools so if you like to check that out click here.
2. Press shift + cmd + N to open a new layer and select the Paint Bucket Tool. To change the color, click on the colored rectangle in the top bar and change the color code to #89ffff. Then change Blending to Soft Light and Opacity to 60%.
3. Open the next layer and change the color to this dark pink with the code #ffc1fd, the Blending to Soft Light and Opacity to 65%.
4. Open the third layer and color it with #89ffff. Blending to Soft Light and Opacity to 60%.

5. Open the last layer, change color with #ff00fe, Blending to Soft Light and Opacity to 85%.
And that´s it! Easy right? I adore this effect because it gives an image this really nice summery vibe and to be honest I really need a bit of summer right now!
To use the exact same picture I used for this tutorial click here and you are ready to go!
If you like this tutorial feel free to leave a comment and tell me what you would like me to do a tutorial on next time! See you soon
xoxo Lea Clara
Did you have a look on my first post about pixelmator? If not you click here to read the full post.


No comments:
Post a Comment